Stacking images in Photodesk
Chris Terran (30 July 2003)
Using five images of an Iridium flare as an example, this tutorial shows how to combine and process them in Photodesk
Resources needed: Photodesk and the five images (548K zip file, images scaled to half-size)
There is also a page on achieving the same effect in Composition.
Our new camera is a Canon 10D digital SLR. We chose this model partly because of its superb low-light characteristics, which make it very suitable for astronomical work.
Most consumer digital cameras suffer from 'hot pixels' when the exposure goes over a few seconds. These show up as star-like dots in an image ... obviously something to be avoided when you're trying to take pictures of stars. For this reason, many cameras will limit the exposure time to some degree -- some models will let you take 30 second exposures, but most constrain it to a couple of seconds; we can see many hot pixels in 2-second (the maximum) exposures from our Fuji cameras.
However, the 10D uses a different type of sensor which suffers much less from this problem. It's currently the digital camera of choice for astrophotography, unless you move into dedicated (and expensive) CCD cameras.
One of our first experiments was a sequence of shots of an Iridium flare, taken from our heavily light-polluted back garden in Leeds just after midnight on 14 July; there was also a full moon.
A couple of test shots established that we couldn't push the exposure much over 15 seconds without the sky washing out in an orange glow. We ended up with a sequence of five images exposed for 6 seconds each, taken consecutively; the camera was on a tripod. These caught the entire sequence of the flare. (In retrospect, what we should have done was stop down the aperture so we could increase the exposure time and avoid the inevitable gaps. Next time.)
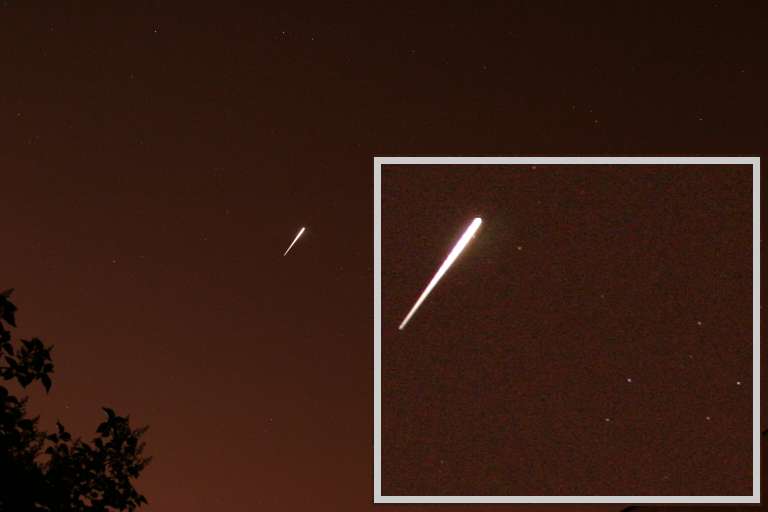
Here's one of the shots, unprocessed apart from scaling to 25%. The inset shows the brightest part of the flare at full size, with a few stars visible:
![[Img_0175s/Jpg]](pix/stacking1/IMG_0175s.jpg)
Iridium flare
Combining the images in Photodesk is fairly straightforward:
- Load the images. The originals are all 3072x2048 2.5MB JPEGs; every image needs 30MB of memory (60MB with undo), so lots of RAM helps -- the Iyonix with 512MB copes fine. If you would like to follow these instructions on your own machine you can get an archive containing all five images here (548K zip file, images scaled to half-size). If you have ample memory load all the images, otherwise load the first two (0173 and 0174).
- Open image 0173, and go to the Calculate dialogue (Ctrl-U or Photodesk>Image>Calculate).
- Set the source images as below, and leave the Destination as 'New'. The combining function we'll use is Screen, which increases the brightness of pixels (the opposite of multiply -- remember that pixel values are considered to be fractions between 0 and 1). Screen combination is commutative, so it doesn't matter which order the images are in.
![[Calc1/Jpg]](pix/stacking1/calc1.jpg)
Combining the first pair of images
- Click on Calculate, and you should get a new image called "Untitled", somewhat lighter in appearance and formed by combining the two pictures..
- Now load the next image in the sequence, 0175. Open the Calculate dialogue again, and set up as below. This time set the destination to 'Untitled' from the pull-down menu:
![[Calc2/Jpg]](pix/stacking1/calc2.jpg)
The next image is merged
- You've now combined three of the images. Carry on with the next two in the same fashion, and you should end up with something like this:
![[Combined/Jpg]](pix/stacking1/combined.jpg)
All five images combined (scaled to 25%)
- Fix and save. As you can see, the light pollution is really showing up now. As well as the orange street lights, the full moon was up -- you can see the glow at the lower left.
- To 'correct' this, we'll adjust the colour balance. Colour isn't an important part of this picture, so it doesn't matter if we fudge it a bit. Open the Image Processing:Balance dialogue. Click on Sample neutral point, and while holding down an Alt key drag out a rectangle over a blank part of the image. I used part of the sky right of the tree.
![[Balance1/Jpg]](pix/stacking1/balance1.jpg)
Correcting the colour
- Some numbers will appear in the Details window and the sliders will move slightly. If you have Preview selected your picture should update too. If it doesn't look right try getting another sample.
- When you're happy, apply with Magic wand:Whole image (remember to check the Opacity is 100%) and fix. You should now have something like this (the actual values will differ slightly):
![[Balance2/Jpg]](pix/stacking1/balance2.jpg)
Applying the correction
- It's too bright. Open the Image Processing dialogue and click on Gamma. Select the Preview button and adjust the curve until it looks OK. Something like this:
![[Gamma/Jpg]](pix/stacking1/gamma.jpg)
Correcting the brightness
- Apply with the Magic wand again. And that's it. Here's the final result (with a blue tint added for a slightly more 'natural' look):
![[Final2/Jpg]](pix/stacking1/final2.jpg)
Iridium flare
- Here's a detail at full size. You can clearly see the stars have trails, even over the 30 second period of all the constituent images. The gaps are caused, of course, by the time between taking each picture; it has the serendipitous advantage that you can see the time scale of the event (each section lasted exactly 6 seconds):
![[Final-Detail/Jpg]](pix/stacking1/final-detail.jpg)
Iridium flare detail
Notes
- An Iridium flare is caused by one of the many Iridium satellites reflecting sunlight off its slowly tumbling body. They can be very bright indeed (the one here was magnitude -8), and are very common all over the world. They can be precisely predicted for any location, and the Heavens Above web site will show you upcoming flares for your site.
- You can also do the stacking with layers, but this does require all the images to be in memory at once.
- Image details (produced by EXIFinfo):
| IMG_0175/JPG
| |
| | Taken : | 1:06:45am Mon 14 Jul 2003
| | Camera : | Canon EOS 10D
| | Size : | 3072 x 2048 pixels
| | Filesize : | 2563 Kbytes
|
|
| shooting information
| | Exposure : | 6 sec at ISO800
| | f : | 4.50
| | Focal length : | 24.00mm
| | Bias : | 0
| | White balance : | Manual
| | Metering : | Average
| | Flash : | Not fired
| | Orientation : | x0,y0=left,top
| | Compression : | 3
|
|
| canon information
| | Image number : | 002-7135
| | Sequence number : | 0
| | Quality : | Fine
| | Image size : | Large
| | Contrast : | Normal
| | Saturation : | Normal
| | Sharpness : | Normal
| | Macro mode : | 0
| | Self-timer duration : | Off
| | Digital zoom : | Off
| | Flash mode : | Off
| | Flash : | Not fired
| | Flash bias : | 0
| | Easy-shoot mode : | Manual
| | Focus mode : | Manual
| | Focus type : | 2
| | Subject distance : | 65535
| | Focus mode 2 : | 65535
| | AF point selected : | 0
| | AF point : | (0 focus points)
| | Metering mode : | Centre-weighted
| | Exposure mode : | Manual
| | ISO : | 0
| | White balance : | 8
| | Continuous drive mode : | Continuous
| | Image type : | IMG:EOS 10D JPEG
| | Owner : | Lee and Chris
| | Serial number : | 259143675
|
|
|